Guides
Part of Home Printmaking Guide: Which Processes Fit a Home Studio
Home printmaking documentation: photographing, mounting, captioning and numbering an edition
A copy photography setup for prints made at home, plus how to hinge, mat, caption and number an edition so the record outlives the print itself.
What to take away
- Home printmaking compared with what actually happens differs by tools, not talent. A dull blade and quick ink decide the first block.
- Two lights at forty-five degrees on either side, a gray card and a tripod will beat any phone filter.
- Photograph the print flat, square to the sensor, with a ruler and a color reference in one frame you keep and crop out of the rest.
- A copy shot of your own print is a record of that print, not a second artwork with its own separate authorship.
- Write the caption before you file the image. Process, paper, block size, edition number and date, in that order.
The copy setup: lights, camera, gray card
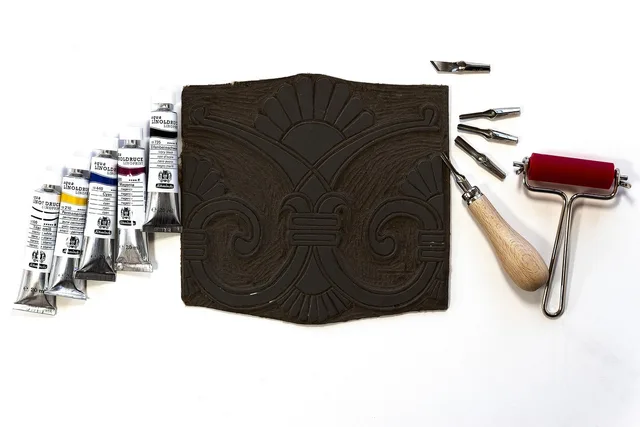
The starter list is nearly the same everywhere: a Speedball linoleum cutter set (typically $15 to $25), a six by twelve inch Speedy-Carve block (typically $10 to $18), water-based block ink and a wooden spoon. Compare them on cost, home-room behavior and cleanup.
Home practice runs on a spoon, a small block and a sink. Studio or press practice runs on a press, a drying rack and a shared edition schedule. At home, one or two pulls are normal. In a studio, the printer pulls a full edition and records each sheet.
What happens at the bench is different. The blade skids because cold lino is hard. Water-based ink skins over in about ten minutes, so the second pull is patchy. The spoon dishes the paper instead of pressing it flat.
Three named fixes close most of it. Cranfield Caligo Safe Wash is an oil-based relief ink that cleans with soap and water; a 75 ml tube typically runs $12 to $22.
Akua Intaglio ink stays open on the plate and cleans with water, typically $20 to $28 for a four-ounce jar. A Speedball baren, typically $15 to $25, spreads pressure more evenly than a spoon.
A 12- to 24-inch etching press from Takach Press in Albuquerque, New Mexico, or the Blick 999 Model II typically runs $1,500 to $5,000 depending on bed width. McClain's Printmaking Supplies in North Plains, Oregon carries the smaller wooden presses, barens, blocks and inks.
Renting press time is common. Robert Blackburn Printmaking Workshop in New York, Kala Art Institute in Berkeley and Spudnik Press in Chicago sell hourly access. Highpoint Center for Printmaking in Minneapolis and Pyramid Atlantic Art Center in Hyattsville, Maryland include press time in classes.
Lay the print on a matte gray or black board on the floor or a table. Put the camera directly above it on a tripod with the sensor parallel to the paper. If the camera tilts, straight edges bow and no software fixes that honestly.
Light from two sides at roughly forty-five degrees, equal distance, equal power. Window light works if the window is large and the sky is overcast, but only if nothing else in the room throws a color cast onto the sheet.
Turn the room lights off. Mixed sources are the most common reason a warm white paper reads green.
Shoot at the lens aperture two stops down from wide open, use the self timer, and check the histogram rather than the screen.
A gray card such as the X-Rite ColorChecker, typically $100 to $130, or a WhiBal card at $40 to $90 gives the white point something to sit on.
Getting the tone right
Relief prints are hard to photograph because the ink is nearly black and the paper is nearly white, which pushes both ends of the scale at once. Expose for the paper and let the ink sit where it falls. Then correct the white point against a gray card in a reference frame.
The National Archives account of tone reproduction in duplicating black and white negatives explains why shadow detail collapses when you normalize the wrong end of the curve.
Keep the raw file. A processed JPEG is a decision you cannot take back, and prints get rephotographed for years.
Presenting the physical print
- Hinge, do not glue. Two small hinges of Japanese tissue and wheat starch paste at the top edge let the sheet move with humidity. Hiromi Paper in Culver City, California sells both.
- Leave the deckle visible if the paper has one. Trimming it removes evidence of the sheet.
- Window mats should be cut from board that is buffered and lignin free, such as Crescent RagMat, and the window should overlap the image by two or three millimeters.
- Mount the print to a board that is the same size as the mat. Common mat sizes are 8 by 10, 11 by 14, 16 by 20 and 18 by 24 inches. A typical border is 2 to 3 inches on each side, so an 8 by 10 inch image fits an 11 by 14 inch mat.
- Sign in soft pencil below the imageedition fraction on the left, title in the center, signature and year on the right. The bottom number is the total edition size, so print 1/10 through 10/10 for an edition of ten. Mark artist proofs A/P and the bon a tirer B.A.T. Keep the B.A.T. and A/P outside the numbered run.
Long-term storage matters as much as framing, and our guide to keeping paper, ink and blocks in usable condition covers the enclosures and the room conditions that decide how a print ages.
What the caption should actually say
A caption that says only the title is useless in two years. Record the process, the block or screen dimensions, the paper by name and weight, and the ink. Add the number of pulls and the date.
Name the sheet: Stonehenge 250 gsm, Rives BFK 280 gsm, or whatever it is. If the print is photographic, add the exposure time and the light source.
The Copyright Office circular on registering photographs as visual art works covers what copyright in a photograph protects: the photographer's artistic choices of subject, position and lens.
That distinction matters when documenting your work: a flat, faithful copy shot documents the print, and the print remains the work you would register.
Our starting point for home printmaking explains where documentation fits in a first year of practice.